How Easy is Twitch Integration With Unity
Twitch is a streaming platform where content creators broadcast themselves live. While broadcasting, viewers interact with each other and the streamer through simple text chat.

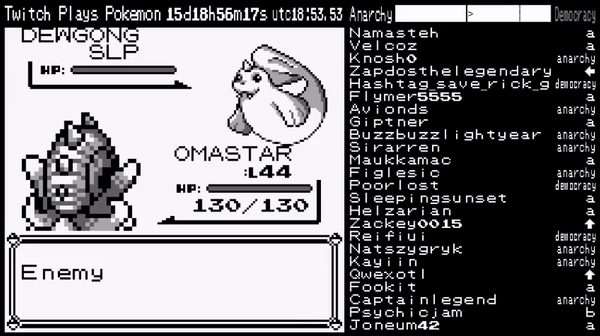
Some content creators realized they could use chat messages to control a game. The most famous example of this is Twitch Plays Pokemon, where viewers control a modified version of Pokémon Red through simple commands.
Stream games are a great way to build and maintain a dedicated audience. They create a sense of community, friendly competition and engage viewers in new and exciting ways. Viewers love to feel like they can directly interact with their favorite content creators, and stream games are a great way to provide that experience.
In this tutorial, you'll learn:
- How to read messages from Twitch chat into Unity.
- Validate commands that can interact with your game.
- All about the different types of audience interaction you could implement.
- Create your very own Pokémon-like Battle game can be played by the audience.
Note: This tutorial uses Unity version 2020.3. If you don't have this version of Unity installed, you can use Unity Hub to install and manage multiple Unity versions across your projects. You'll also need a Twitch account.
Getting Started
Click Download Materials at the top or bottom of this tutorial to download the starter and final projects. Extract them. Then open Twitch Chat Game Starter using the Unity Editor.
Take a look at Assets/RW. Here you'll see your project folders, including:
- Prefabs
- Scenes
- Scripts
- Sprites
RW/Scenes contains two scene files: Battle and Golf.
For this tutorial, you'll work in Battle. You can use Golf for a bonus game at the end of the article.
The first step in creating a Twitch Chat game is connecting your app to your Twitch account and parsing incoming messages.
The Twitch Chat Script
If you haven't already, open the Battle scene. In Assets/RW/Scripts/Common create a script called TwitchChat.
Import the System.IO and System.Net.Sockets namespaces:
using System.IO; using System.Net.Sockets; In TwitchChat's body, create the fields shown below:
public string username; // 1 public string password; public string channelName; private TcpClient twitchClient; // 2 private StreamReader reader; // 3 private StreamWriter writer; private float reconnectTimer; // 4 private float reconnectAfter; Here's a code breakdown:
- These strings hold your twitch account credentials, letting your app connect to your account.
- You declare a private
TcpClient, which establishes a connection with Twitch using your credentials. - Then you create a private
StreamReaderand privateStreamWriter. TheStreamWritersends your credentials to Twitch and theStreamReaderpulls in the messages from chat. -
reconnectTimertracks the amount of time passed since connecting whilereconnectAftersets how long to wait before attempting to reconnect. Sometimes the connection to Twitch closes automatically, so the app should attempt to reconnect after a short time.
Create a private method called Connect. Implement it as below:
private void Connect() { twitchClient = new TcpClient("irc.chat.twitch.tv", 6667); // 1 reader = new StreamReader(twitchClient.GetStream()); // 2 writer = new StreamWriter(twitchClient.GetStream()); writer.WriteLine("PASS " + password); // 3 writer.WriteLine("NICK " + username); writer.WriteLine("USER " + username + " 8 *:" + username); writer.WriteLine("JOIN #" + channelName); writer.Flush(); } This method:
- Instantiates
twitchClientwith the URL for the Twitch chat API and the port. - Then instantiates both
readerandwriterwithtwitchClient.GetStream(). - Uses
writerto pass your credentials to Twitch.
Add the following to Start:
reconnectAfter = 60.0f; Connect(); This code sets reconnectAfter to 60 seconds and calls Connect.
Now TwitchChat is ready to start reading in chat messages from Twitch.
Reading in Chat Messsages From Twitch
Add the following ReadChat method:
public void ReadChat() { if (twitchClient.Available > 0) // 1 { string message = reader.ReadLine(); if (message.Contains("PRIVMSG")) // 2 { print(message); } } } Here's a code breakdown:
- In
ReadChat, you check iftwitchClient.Availableis greater than 0. If so, you savereader.ReadLine()tomessage. - If
messagecontains "PRIVMSG", it's a user created message. Print the message to the Unity console.
Then inside Update, add:
if (twitchClient.Available == 0) // 1 { reconnectTimer += Time.deltaTime; } if (twitchClient.Available == 0 && reconnectTimer >= reconnectAfter) // 2 { Connect(); reconnectTimer = 0.0f; } ReadChat(); // 3 Here, you:
- Check if
twitchClient.Availableis 0. If it is 0, you addTime.deltaTimetoreconnectTimer. - If
reconnectTimeris greater than or equal toreconnectAfter, the app disconnected for a minute. In that case, reconnect withConnect, and resetreconnectTimerto 0. - Then, call
ReadChat()to read in the messages.
Later, TwitchChat will filter commands from regular messages. For now, you'll test to make sure it works.
In the Hierarchy, add TwitchChat to GameManager, found in Managers. Fill in the TwitchChat fields with your Twitch credentials.
The username and channel name fields should both be your Twitch username. Head over to twitchapps.com/tmi to generate a API token. Copy this into the password field.

With your credentials filled out, you're ready to test!
Press Play and open your Twitch channel in a web browser. Try typing some messages into the chat. Even when not broadcasting, you'll see them appear in Unity's console.

Parsing Chat Commands
You want to be able to differentiate between then messages sent to your app and the user that sent them.
In RW/Scripts/Common, create a script called ChatMessage. Note it is not a Monobehaviour and simply holds two variables:
[System.Serializable] public class ChatMessage { public string user; public string message; } ChatMessage holds a message and the username of the user that sent it. It also uses System.Serializable to store it in a List.
In TwitchChat, update ReadChat to:
public ChatMessage ReadChat() // 1 { if (twitchClient.Available > 0) { string message = reader.ReadLine(); if (message.Contains("PRIVMSG")) { // Get the username int splitPoint = message.IndexOf("!", 1); // 2 string chatName = message.Substring(0, splitPoint); chatName = chatName.Substring(1); //Get the message splitPoint = message.IndexOf(":", 1); message = message.Substring(splitPoint + 1); ChatMessage chatMessage = new ChatMessage(); // 3 chatMessage.user = chatName; chatMessage.message = message.ToLower(); return chatMessage; } } return null; // 4 } This updated code:
- Returns a
ChatMessageand removes theprintcall. - Splits the message to get the body of the message and the username of the user who sent it.
- Stores these values in a new
ChatMessageand returns it. - Since
ReadChatnow needs to return something, it returnsnullat the bottom of the method, when no connection was available.
Now you need to process messages to find game commands, validate them, then execute them.
Parsing and Storing Commands
Create a script in RW/Scripts/Common called IGameCommand. It's short and sweet:
using System.Collections.Generic; public interface IGameCommand { string CommandString { get; } string ShortString { get; } } IGameCommand has a CommandString field, which stores the string required to execute it. For example, Battle has users vote for in-game options, so a CommandString for a vote command would be !vote.
Additionally, IGameCommand has a ShortString field, holding a shorthand version of the command. For example, a command with a CommandString of !vote could have the ShortString !v.
In RW/Scripts/Common, create a script called ChatCommand.
If a ChatMessage contains a valid command, its data is stored in a ChatCommand. Import the System namespace (and System.Collections.Generic if it wasn't added by default). Then give ChatCommand the [System.Serializable] decorator and create the fields shown below:
using System.Collections.Generic; using System; [System.Serializable] public class ChatCommand { public IGameCommand command; // 1 public string username; // 2 public DateTime timestamp; // 3 public List<string> arguments; // 4 //... These fields store the:
- Command script for the command the user submitted.
- Username of the user that submitted the command.
- Exact time the user submitted the command, which can be useful for logging user actions and debugging gameplay issues.
- Arguments submitted with the command.
ChatCommand needs a constructor and two methods: Execute and ParseCommandArguments. Insert these below the public fields:
public ChatCommand(ChatMessage message, IGameCommand submittedCommand) // 1 { arguments = new List<string>(); // 2 command = submittedCommand; // 3 username = message.user; timestamp = DateTime.Now; ParseCommandArguments(message); // 4 } public void ParseCommandArguments(ChatMessage message) { string[] splitMessage = message.message.Split(); if (splitMessage.Length > 1) { for (int i = 1; i < splitMessage.Length; i++) { arguments.Add(splitMessage[i]); } } } Here's a code breakdown:
- The constructor takes two arguments:
ChatMessageandIGameCommand. - Then it instantiates
argumentsto a newList. - Next, it assigns
submittedCommandtocommand,message.usertousernameand setstimestamptoDateTime.Now. - Finally, it calls
ParseCommandArgumentsand passes inmessage.
ParseCommandArguments splits the message to isolate any values after the command string and adds them to arguments. For example, if a user submits !vote 1, then 1 is the stored argument.
The Game Manager
The GameManager is your app's the brain. It uses your scripts to read incoming messages, parse commands and execute valid commands in-game.
In RW/Scripts/Common, create GameManager. Then attach GameManager to Managers/GameManager in the scene hierarchy.

Open the GameManager script. Above the GameManager class, declare an enum called GameState. Give it two values: Playing and GameOver:
public enum GameState { Playing, GameOver } In the GameManager class, add:
public GameState gameState; // 1 public ChatCommand currentCommand; // 2 private TwitchChat chat; // 3 private List<ChatCommand> newCommands; // 4 private IGameCommand[] gameCommands; // 5 These fields hold:
- An enum that identifies the game's current state.
- The command the game manager is currently executing.
- A reference to
TwitchChatsoGameManagercan read in chat messages. - The list of user submitted commands.
- An array of valid game commands, attached to the same object as the GameManager.
Next, implement Start and a private SetGameState as shown below:
void Start() { gameCommands = GetComponents<IGameCommand>(); newCommands = new List<ChatCommand>(); chat = gameObject.GetComponent<TwitchChat>(); SetGameState(GameState.Playing); } private void SetGameState(GameState newGameState) { gameState = newGameState; } Start initializes some of the class's fields and sets the default game state. SetGameState takes a GameState and sets the gameState field.
Now, create a public method called ResetGame:
public void ResetGame() { if (gameState != GameState.Playing) { SetGameState(GameState.Playing); } } If it's not already set to Playing, ResetGame sets gameState to Playing. Later, this method will return the game to its original state, so a new game can start.
Create a public method called EndGame and implement it as below:
public void EndGame() { if (gameState != GameState.GameOver) { SetGameState(GameState.GameOver); } } If it's not already set to GameOver, EndGame sets gameState to GameOver. Later, this method will do everything needed when a game is over, such as displaying a scoreboard.
Next, open IGameCommand. Add this method signature to the bottom of the interface:
bool Execute(string username, List<string> arguments, GameManager gm = null); Now IGameCommand has a method called Execute that returns a boolean and takes three parameters:
- A string storing the username of the player that submitted the command.
- The
Listof strings storing arguments passed with the command. For example, an argument for !vote would be the option's number. So, the user would submit the command !vote 1. - A
GameManager, set to null by default.
Now, go back into ChatCommand. Add the following at the bottom of the class:
public bool Execute(GameManager gm) { return command.Execute(username, arguments, gm); } Execute calls command.Execute, passing in the required variables: username, arguments and GameManager. It also returns a boolean indicating if the command was successful.
Of course, you need to check that any incoming chat message matches a valid command.
Validating Commands
Back in GameManager, create a private method called CommandIsValid that takes a ChatMessage and returns an IGameCommand, as shown below:
private IGameCommand CommandIsValid(ChatMessage chatMessage) { if(chatMessage != null) { string commandString = chatMessage.message.Split()[0]; // 1 foreach (IGameCommand command in gameCommands) // 2 { if (commandString == command.CommandString || commandString == command.ShortString) // 3 { return command; } } } return null; // 4 } In this code:
-
CommandIsValidsplits theChatMessageand gets the first string to check if its a valid command string, for example !vote. - It loops through each command in
gameCommands. - If the command string matches a
IGameCommand'sCommandStringorShortString, then it returns the command. - If it doesn't find a match, it returns null.
Now, replace Update with FixedUpdate. Declare a private method ProcessCommands after it. Implement them both as below:
void FixedUpdate() { if (gameState == GameState.Playing) //1 { ChatMessage recentMessage = chat.ReadChat(); //2 IGameCommand command = CommandIsValid(recentMessage); //3 if (command != null) //4 { ChatCommand newCommand = new ChatCommand(recentMessage, command); //5 newCommands.Add(newCommand); } ProcessCommands(); //6 } } private void ProcessCommands() { if (newCommands.Count > 0) { newCommands[0].Execute(this); //7 newCommands.RemoveAt(0); } } In FixedUpdate, the code:
- Checks if
gameStateisGameState.Playing. - Calls
chat.ReadChatand stores the returnedChatMessagein a variable calledrecentMessage. - Then checks if the command is valid by calling
CommandIsValid, passing inrecentMessage. It stores what returns in aIGameCommandcalledcommand. - Checks if
commandisn't null, meaning your app received a valid command. - Then creates a new
ChatCommand, passing in the required variables. - Calls
ProcessCommandsto execute the stored commands.
In ProcessCommands, the code:
- Gets the oldest command in
newCommandsand callsExecute, then removes that command from the list.
That's all you need to read and execute incoming commands! Time to test all this code!
Testing Commands
In RW/Scripts/Battle, create a script called Vote. This command will print incoming !vote commands to the console so you can test if your Twitch integration works.
Attach Vote to the GameManager object in the scene hierarchy. GameManager only uses commands attached to the same GameObject.
Have Vote implement IGameCommand, and add the following public fields:
public class Vote : MonoBehaviour, IGameCommand { public string CommandString => "!vote"; public string ShortString => "!v"; } IGameCommand fields CommandString and ShortString are set to !vote and !v, respectively.
Finally, implement method the Execute method from IGameCommand, that takes the required arguments and prints the message:
public bool Execute(string username, List<string> arguments, GameManager gm = null) { print(username + " sent the !vote command"); return true; } Since Execute needs to return a boolean, return true for now.
Open TwitchChat again. In Update, remove the call to ReadChat(). Now, Vote's Execute takes care of this.
Return to Unity and Play the app. Enter the !vote and !v commands into your Twitch chat and watch the console in Unity reflect these messages.

Congratulations! You now have Commands from Twitch being recognised by your Unity game. But how should you use them?
Your Twitch Audience and You
The first thing you need to decide when designing a game for Twitch is how the audience will interact with the game, the player/streamer, or both!
Audience vs Audience
Audience vs Audience games pit viewers against one another. One popular example is Marbles on Stream, where viewers claim a marble that races down a custom track.

Marbles on Stream doesn't have any viewer interaction beyond a viewer joining the race, but that doesn't mean games like that can't exist! After completing this tutorial, you'll get the tools and assets you need to create your own Audience vs Audience mini-putt style game.
Audience vs Game
Popularized by Twitch Plays Pokemon, Audience vs Game experiences have become the most common type of stream game on Twitch. In AvG games, all viewers can control the player character and work cooperatively to beat the game.
Some AvG games use voting mechanics to choose the next action. In contrast, others allow a complete free-for-all, executing every command submitted to the chat for a hilariously chaotic experience.

Audience vs Streamer
In Audience vs Streamer games, viewers use commands to help or hinder the streamer's progress in a single-player game. Shockingly, AvS games seem to be the least popular style of stream game, which may be due to the challenges that come with Audience-to-streamer interaction, such as delay. However, there are quite a few AvS games available on online marketplaces with overall positive reviews.
Common Design Challenges
While there are a variety of stream games, all are subject to some common challenges. These challenges are unique to Twitch Chat games, so you may not have considered them before now.
Delay
Nearly all live streams suffer from some form of delay between what the streamer does and what the viewer sees. When designing a game with audience interaction, it's important to take delay into account so the experience is fair and balanced for most viewers. The delay viewers experience can vary depending on their internet speeds or geographical locations.
On a similar note, Twitch has an automatic spam filter to prevent users from sending the same message twice in a short time. Unfortunately, there's no way to turn this feature off, so you must give your audience multiple ways to send the same command.
Audience Interaction
The more interaction you include in your game, the more challenges you have to consider. Games like Marbles on Stream have limited viewer interaction, which prevents delay-related issues.
Twitch Plays Pokemon started as a complete free-for-all. Eventually, it became so popular its developers had to implement a voting system so viewers could make progress in the game. Audience interaction can be tough to design effectively, but if done well, it makes viewers feel more engaged in the experience.
Streamer Interaction
Commonly, streamers take on the role of the commentator, describing what's happening on screen in an entertaining way. However, if you plan to create an Audience vs Streamer experience, you'll need to consider how complex the streamer's role needs to be to make the game entertaining to play and watch.
Where's the Fun?
When making any game, the first question you should ask is, "Where's the fun?" What aspect of your game do viewers find entertaining?
Twitch Plays Pokemon was fun because of a shared story that anyone could be a part of. Marbles on Stream is fun because it's similar to watching a sport and rooting for your favorite team.
The fun in a game should be simple and easy to describe in a few sentences. If you find yourself explaining your game at length, or having to provide a lot of context to describe your idea, consider simplifying your game until you can identify a short and satisfying gameplay loop.
In this tutorial, you'll focus on the Audience vs Game style of stream game, in the form of a simplified Pokémon-like Battle scene.
Exploring the Sample Scene

If you're familiar with the Pokémon video game franchise, your first thought might be, "Wow, this looks almost identical to Pokémon. Like, basically a complete ripoff of the battle sequence from Pokémon Fire Red".
However, if you thought this, you'd be WRONG. It is, in fact, a complete ripoff of the battle sequence from Pokémon Leaf Green.
Of course, there are a few major differences between this scene and Pokémon, aside from Aknee and Bubblesnek.
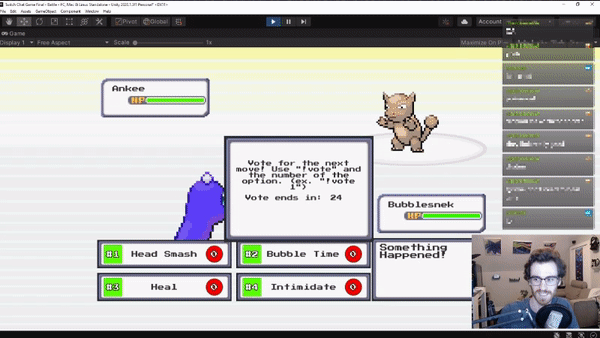
You'll find the moves at the bottom of the screen. They all have a green label with a number symbol on the left and a red label on the right.

The green label displays the option number of the attack, which viewers use to vote for their preferred option. The red label shows the current number of votes for that option.
VoteTimer is another critical UI element. It's the text box in the center of the scene.

The text box tells viewers to decide the next move using the command !vote followed by an option number.
It also displays a timer counting down to the end of voting. Then it uses the move with the most votes against the opponent. You'll see all moves announced in the description box on the bottom right in classic Pokémon style.
After the audience makes their move, the opponent attacks. Two health bars show how much damage the audience or the opponent takes: top left for the opponent and bottom right for the audience.
If Bubblesnek still has some health left after the opponent attacks, another vote triggers.
Creating Commands
You need to tell Vote what options are available for voting. To do this, you'll create a script called
In RW/Scripts/Battle, create a script called VoteOption.
Before you open VoteOption, navigate to RW/Prefabs/Battle in the Project pane. Open ActionButton.
Attach VoteOption to the prefab. Save the changes and close the Prefab Editor. Now all the ActionButtons in the scene have this script. You can find the ActionButtons in the scene hierarchy under UI/BattleCanvas/Player/Actions.
Open the VoteOption script.
Import UnityEngine.UI and add System.Serializable to VoteOption like this:
using UnityEngine.UI; [System.Serializable] public class VoteOption : MonoBehaviour { //... Using System.Serializable lets you store the class in a List.
Next, declare the following public variables inside VoteOption:
public int optionNumber; // 1 public Text voteCounter; // 2 public int voteCount; // 3 public Text optionNumberLabel; // 4 public bool voteActionExecuted; // 5 public IVoteAction voteAction; // 6 These fields store:
- The option's number used for voting. For example, in the command !vote 1, 1 is the
optionNumber. - A red label on the ActionButton, used to display the current number of votes for this option.
- The total number of votes for this option.
- A green label on the ActionButton, used to display the option number for this VoteOption.
- Whether this VoteOption executed its in-game action.
- An
IVoteAction that executes if this option receives the most votes.
Note: I created the IVoteActions for you. You'll find them in RW/Scripts/Battle.
After Start, create a method called SetOptionNumberText:
public void SetOptionNumberText() { optionNumberLabel.text = "#" + optionNumber.ToString(); } This sets the option number label to the optionNumber.
Mark Start as private and implement it as below:
private void Start() { SetOptionNumberText(); voteAction = GetComponent<IVoteAction>(); } Here, this code calls SetOptionNumberText and sets voteAction to the IVoteAction attached to the same VoteOption GameObject.
Now you need a method to call when VoteOption receives a vote. Create a method called AddVote:
public void AddVote() { voteCount++; voteCounter.text = voteCount.ToString(); } This method increases the voteCount by one and updates voteCounter.text with voteCount's value.
Nex, create a method called ClearVotes, which clears votes before a new vote phase:
public void ClearVotes() { voteCount = 0; voteCounter.text = voteCount.ToString(); voteActionExecuted = false; } This sets voteCount to 0, updates voteCounter.text and sets voteActionExecuted to false.
Finally, create a method called ExecuteOption, which checks if voteActionExecuted is false:
public void ExecuteOption() { if (!voteActionExecuted) { voteAction.Execute(); voteActionExecuted = true; } } If voteActionExecuted is false, this method calls voteAction.Execute and sets voteActionExecuted to true. Checking if voteActionExecuted is false prevents you from accidentally executing the same action twice.
Return to Unity. In the hierarchy, go through each ActionButton in UI/BattleCanvas/Player/Actions and give each a unique Option Number from 1 to 4. Expand each button and drag the Text inside OptionNumberLabel into Option Number Label. Drag the Text inside VoteCount into VoteCounter.

Leave Vote Count at 0 and Vote Action Executed as false.
Expanding the Vote Script
Time to expand Vote to use VoteOption.
Open Vote.
Import UnityEngine.UI:
using UnityEngine.UI; Declare the following public variables underneath ShortString:
public float votePhaseLength; // 1 public bool isVotingOpen; // 2 public List<VoteOption> voteOptions; // 3 public GameObject voteTimerObject; // 4 public Text voteTimerLabel; // 5 public VoteOption selectedOption; // 6 public BattleManager battleManager; // 7 private float votePhaseTimer; // 8 Here's a variable breakdown:
- How long in seconds the audience has to submit a vote.
- Allow voting during the vote phase, as well as prevent voting after the vote phase ends.
- Available
VoteOptions. - Voting timer in the
VoteTimertext box, shown in the center of the scene. - Text UI element in
VoteTimer. - The
VoteOptionthat won the majority vote. - The
BattleManager. - Remaining time of the vote phase.
In Execute, replace what you currently have with:
public bool Execute(string username, List<string> arguments, GameManager gm = null) { if (isVotingOpen) // 1 { if(int.TryParse(arguments[0], out int optionVoted)) //2 { foreach (VoteOption option in voteOptions) // 3 { if (option.optionNumber == optionVoted) { option.AddVote(); } } return true; // 4 } } return false; // 5 } This updated code:
- Checks if
isVotingOpenis true. - If true, it gets the number of the option that received a vote by parsing the first argument into an int.
- For each
VoteOptioninvoteOptions, it checks if it'soptionNumbermatches the number submitted. If it does, it callsAddVotefor that option. - Outside the loop, it returns true to indicate that the command executed successfully.
- If a user submits a vote while voting is closed, or if the option passed in wasn't parsed to an int, you want
Executeto indicate that it failed. So, return false outside theisVotingOpencheck.
Create a method called OpenVoting:
public void OpenVoting() { isVotingOpen = true; // 1 voteTimerObject.SetActive(true); // 2 foreach (VoteOption option in voteOptions) { option.ClearVotes(); // 3 } votePhaseTimer = votePhaseLength; // 4 } OpenVoting opens a new vote phase by:
- Setting
isVotingOpento true. - Activating
voteTimerObject. - Clearing all votes.
- Resetting
votePhaseTimer. -
CloseVotingsetsisVotingOpento false to prevent counting new votes. - Then it also deactivates
voteTimerObject. - Next, it sorts the
VoteOptionsfrom highestvoteCountto lowest and selects the most voted option. - Finally, it sets the battle phase to 1. When
battlePhaseis 0,BattleManagerwaits for voting end. WhenbattlePhaseis 1,BattleManagerknows to proceed by announcing the chosen action. - Check if
battleManager.battlePhaseis 0 and ifisVotingOpenis false. If it is, you callOpenVoting. - Since voting is open, you check if
votePhaseTimeris greater than 0. If so, you reduce the time byTime.deltaTimeand updatevoteTimerLabel. - Then, if
votePhaseTimeris less than or equal to 0, you callCloseVoting.
Next, create a method called CloseVoting and implement it as below:
public void CloseVoting() { isVotingOpen = false; // 1 voteTimerObject.SetActive(false); // 2 voteOptions.Sort((VoteOption a, VoteOption b) => a.voteCount < b.voteCount ? 1 : -1); selectedOption = voteOptions[0]; // 3 if (battleManager.battlePhase == 0) { battleManager.battlePhase = 1; // 4 } } Here's a code breakdown:
Finally, add the following code in Update:
// count down vote phase timer if (battleManager.battlePhase == 0 && !isVotingOpen) // 1 { OpenVoting(); } if (isVotingOpen) // 2 { if (votePhaseTimer > 0) { votePhaseTimer -= Time.deltaTime; voteTimerLabel.text = votePhaseTimer.ToString("0"); } else // 3 { CloseVoting(); } } Here, you:
Expanding BattleManageer
Next, open RW/Scripts/Battle/BattleManager.cs. It has several commented out references to Vote. I didn't want them sending errors to the console while you worked on getting Vote ready.
Now Vote is ready, uncomment:
- The
Votefield on line 38. -
AnnouncePlayerActionon lines 84-90/. -
ExecutePlayerActionon lines 95-102.
The BattleManager code shares a lot of functionality with Vote, but controls the opponent rather than the player character. It also controls the battle's pace and displays the current action of the player or opponent.
Save your scripts and go back into Unity. With the comments removed, BattleManager now has a public Vote field in the inspector.
Click BattleManager in the hierarchy. Then drag the GameManager object into the Vote field of the BattleManager script.

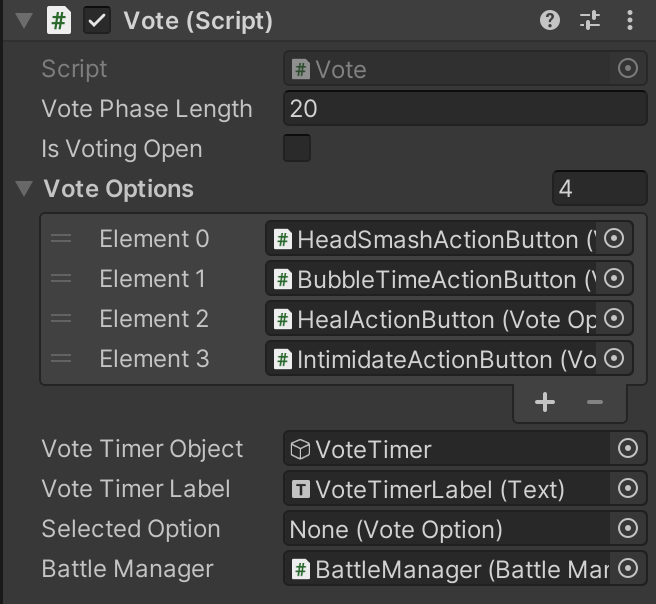
Select GameManager in the hierarchy and look at the Vote component. Set the following values:
- Vote Phase Length to 20. Feel free to play around with this value.
- Drag each of the VoteOption buttons you set up earlier onto the list of Vote Options.
- Vote Timer Object to UI/BattleCanvas/VoteTimer.
- Vote Timer Label to UI/BattleCanvas/VoteTimer/VoteTimerLabel.
- Battle Manager to Managers/BattleManager.
Game Over and New Game Conditions
The game isn't quite ready to play yet. You still need to add some game logic, like what should happen when the battle is over?
Battle needs its own logic for when you consider a game to be over, as well as instructions for what to do when that happens.
It also needs instructions on how to start a new game, such as resetting the health of both creatures. You'll start by validating the game is actually over.
Game Over Check
Before executing a Game Over Action, you need a script that checks if the game has reached game over conditions. For GameManager to check these conditions no matter what game it's managing, you need to create an interface, so GameManager always knows what to expect.
In RW/Scripts/Common, create a new script called IGameOverCheck. Open it and replace the default code with:
public interface IGameOverCheck { bool IsGameOver(GameManager gm); } This interface defines one method that takes a GameManager as an argument and returns a boolean.
Any script implementing this interface must have an IsGameOver that returns true if the game over conditions are met. Even though it's small, interfaces like this can be a handy way of defining a type for a class without forcing it to inherit from a parent class.
Now all GameManager has to do is look for an IGameOverCheck and call IsGameOver to know whether or not to end the game. This also means any script using IGameOverCheck can be as simple or as complex as needed.
Time to create a Game Over Check specific to Battle. Create a script in RW/Scripts/Battle called BattleGameOverCheck and open it.
BattleGameOverCheck uses the interface you created and defines the Battle scene's game over conditions.
The battle should end when one of the...Backpack...Demons...Badmons...
The battle should end when one of the Legally Distinct Pokémon-like Battle Creatures reaches 0 HP. :]
In BattleGameOverCheck, implement IGameOverCheck as below:
using UnityEngine.UI; public class BattleGameOverCheck : MonoBehaviour, IGameOverCheck { public Slider playerHealth; public Slider opponentHealth; public bool IsGameOver(GameManager gm) { if (playerHealth.value <= 0 || opponentHealth.value <= 0) { return true; } return false; } } This Game Over Check looks at two different Sliders, representing the player's and opponent's health. In IsGameOver, it returns true if either slider's value is less than or equal to 0. Otherwise, it returns false.
Game Over Action
Just like IGameOverCheck, you need a common definition of what the GameManager should do if a game is over.
In RW/Scripts/Common, create a script called IGameOverAction.
public interface IGameOverAction { void Execute(GameManager gm); } Execute, that takes a GameManager.
Back in RW/Scripts/Battle, create a script called BattleGameOverAction:
public class BattleGameOverAction : MonoBehaviour, IGameOverAction { public GameObject gameOverPanel; public void Execute(GameManager gm) { gameOverPanel.SetActive(true); } } BattleGameOverAction implements IGameOverAction and has a public reference to the GameOverPanel UI element. Execute in BattleGameOverAction activates the GameOverPanel.
While GameManager now knows how to end a game, you need to tell it how to start over.
New Game Action
Like the Game Over Action, you need to define what GameManager needs to prepare the scene for a new game.
In RW/Scripts/Common, create a script called INewGameAction, which is pretty much identical to IGameOverAction:
public interface INewGameAction { void Execute(GameManager gm); } When a new Battle game starts, both health bars should reset and the game over panel should hide.
Now, in RW/Scripts/Battle, create a script called BattleNewGameAction.
BattleNewGameAction implements INewGameAction, as shown below:
using UnityEngine.UI; public class BattleNewGameAction : MonoBehaviour, INewGameAction { public Slider playerHealth; public Slider opponentHealth; public GameObject gameOverPanel; public void Execute(GameManager gm) { playerHealth.value = 100; opponentHealth.value = 100; gameOverPanel.SetActive(false); } } It has public variables for both health sliders and the game over panel. In Execute, set the both health bar values to 100 and deactivate the game over panel.
Back in the editor, add BattleGameOverCheck, BattleGameOverAction and BattleNewGameAction to the Managers/GameManager object and set their fields to the appropriate GameObjects:
In Battle Game Over Action set Game Over Panel to UI/BattleCanvas/GameOverPanel.
Then, in Battle Game Over Check set:
- Player Health to UI/BattleCanvas/Player/PlayerHealth.
- Opponent Health to UI/BattleCanvas/Opponent/OpponentHealth.
In Battle New Game Action set:
- Player Health to UI/BattleCanvas/Player/PlayerHealth.
- Opponent Health to UI/BattleCanvas/Opponent/OpponentHealth.
Finally, in Battle New Game Action set Game Over Panel to UI/BattleCanvas/GameOverPanel.

Revisiting the GameManager
Currently, GameManager is configured to handle incoming commands and run corresponding actions. But you need to expand it to use the last three interfaces you created.
Open RW/Scripts/Common/GameManager.cs. Add these private fields above Start:
private IGameOverCheck gameOverCheck; private IGameOverAction gameOverAction; private INewGameAction newGameAction; In Start, use GetComponent to assign these variables to scripts attached to this GameObject, as shown below:
gameOverCheck = GetComponent<IGameOverCheck>(); gameOverAction = GetComponent<IGameOverAction>(); newGameAction = GetComponent<INewGameAction>(); Then, in ResetGame, call newGameAction.Execute before setting the game state, passing this as a reference to the GameManager:
public void ResetGame() { if (gameState != GameState.Playing) { newGameAction.Execute(this); // 1 SetGameState(GameState.Playing); } } In EndGame, call gameOverAction.Execute before setting the game state. Pass the keyword this as a reference to the GameManager:
public void EndGame() { if (gameState != GameState.GameOver) { gameOverAction.Execute(this); SetGameState(GameState.GameOver); } } Update FixedUpdate as shown below:
void FixedUpdate() { if (gameState == GameState.Playing) { if (gameOverCheck == null || !gameOverCheck.IsGameOver(this)) { ChatMessage recentMessage = chat != null ? chat.ReadChat() : null; IGameCommand command = recentMessage != null ? CommandIsValid(recentMessage) : null; if (command != null) { ChatCommand newCommand = new ChatCommand(recentMessage, command); newCommands.Add(newCommand); } ProcessCommands(); } else if (gameOverCheck.IsGameOver(this)) { EndGame(); } } } FixedUpdate now checks if gameOverCheck is null, or if gameOverCheck.IsGameOver returns false. This prevents new commands from storing and processing if the game is currently over.
Now, it also includes a check if gameOverCheck.IsGameOver returns true. If so, it calls EndGame.
Go back into Unity. To trigger BattleNewGameAction, you need to link GameManager.ResetGame to UI/BattleCanvas/GameOverPanel/NewGameButton.
Select NewGameButton and find the On Click trigger list on the Button component. Add a new trigger. Drag GameManager into the empty object slot and select GameManager.ResetGame in the dropdown list.

That's it! Give it a try with some friends!
Using What You've Learned
You have the foundation and the know-how to create Twitch Chat games! Time to test those newfound skills.
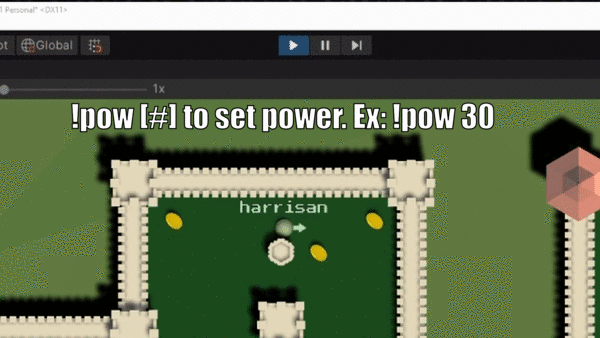
There's another scene in the project called Golf. Use what you learned with Battle to turn it into a functional game!
Need help? Just open the spoiler below to find out how.
[spoiler title="Golf Game Requirements"]
Golf has the following requirements:
- A GameManager keeps track of players and can retrieve a player by username.
- Include a join command so audience members can join the game.
- When an audience member joins, spawn a golf ball for them in a random color with their twitch username displayed above the ball.
- Include commands to let a player:
- Set the direction of their ball.
- Set the power of their stroke.
- Launch their ball in the specified direction, at the specified power.
- A Game Over Check checks if all players have reached the hole.
- A Game Over Action disables commands and displays a scoreboard with the players listed from highest score to lowest score.
- A New Game Action resets the course and lets audience members submit commands.
See the following GIFs for an idea of what these features look like:


If you get stuck while working on Golf, check out the completed version in the Final assets to see some solutions.
[/spoiler]
Where to Go From Here?
Use the Download Materials button at the top and bottom of this tutorial to download both the starter and final projects. You can use the final project to compare with your own work.
In this tutorial you learned how to read messages from Twitch chat, and how to use them to interact with your game. Or two games if you did the bonus Golf game too!
Check out Introduction to Multiplayer Games With Unity and Photon to learn more about creating multiplayer games with Unity.
And while you are hanging out on Twitch, don't forget to follow Unity Tech for live streams of Made With Unity games and developer showcases. :]
I hope you enjoyed this article. If you have any questions or comments, please join the forum discussion below. See you in the next one!
Source: https://www.raywenderlich.com/24373608-how-to-create-a-twitch-chat-game-with-unity
0 Response to "How Easy is Twitch Integration With Unity"
ارسال یک نظر